How to Enable All Cores on Windows 10

From my steam launch options articles, many gamers wanted to know how they could run other games on windows 10 that are not on steam using all their CPU cores on Windows 10. Well, don’t worry noobs2pro has a solution for that as well. Now even you can enable all cores on Windows 10 for gaming.
To be honest, Windows 10 by default set to use all available cores but sometimes due to misconfigurations or other apps, the other cores are disabled to save power and battery. This happens mostly on laptops.
So here is how you can enable all cores on Windows 10 for gaming.
Do note: Might affect laptop battery life since more cores means more power consumption.
- Press Ctrl + Shift + Esc to bring up Task Manager. You can alternatively start the task manager from the search bar as well.
- Select the Details section as shown in the image below:

- Right-click the game whose cores use you want to change
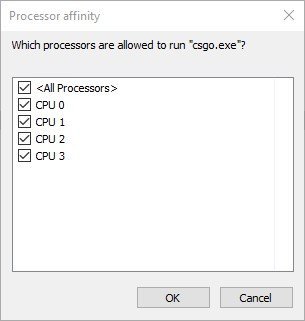
- Right-click and select Set “Affinity”. As you can see here you can select the number of cores you want to use for gaming.

- Choose one or more cores and check the box to select as per your requirements.

Batch Script For Running Games using All Cores (Expert users only)
There is a useful batch script that you can create to force games to use all processors. You shouldn’t need to use it but for any reason, you feel that you need it here it is…
Open Notepad or Notepad++.
Type the following in the text file:
start /affinity 1F game.exe
Change game.exe to the name of the specific game which you’re trying to modify and save the file with the “.bat” extension at the end. This creates it as a batch file that you can run as per need.
The affinity value will change as per your CPU Count. It can be 1,3,7, F,1F,3F etc. This page on the Microsoft Developer website has a full list of affinities.
Run the Batch file you just made to launch the program in respective mode. This is meant for expert users only and should not be used by people who are new to computers in general. We won’t be providing any support for the script either. So you are on your own with that.
I hope this guide helped you use all your enable CPU cores in windows 10 for gaming. Happy Gaming. See you in-game


