
DOTA 2 Best settings for Max FPS gaming & Lag-free Gaming

DOTA 2 is currently the most popular game in the world of gaming. Even the prize pools for these games are mind-blowing. So with that in mind, I decided to make another easy-to-follow guide for max performance and FPS settings in DOTA 2.
So two things can be edited in DOTA 2. The first is the steam launch options and the second is the in-game settings of DOTA 2.
Table of contents
- MAX FPS Settings Guide: DOTA 2
- In-Game Settings For DOTA 2
- Resolution
- Options
- Rendering
- Use basic settings: Off.
- Use advanced settings: On.
- Animate Portrait: Off.
- Addictive Light Pass: Off.
- World Lighting: Off.
- Ambient Occulsion: Off.
- Normal Maps: Off.
- Ambient Creatures: Off.
- Ambient Cloth simulation: Off.
- Grass: Off.
- Anti-aliasing: Off.
- Specular: Off.
- Specular and Light Shadows: Off.
- High-quality Water: Off.
- Atmospheric fog / Caustics: Off.
- High-quality Dashboard: Off.
- VSync: Off.
- Tree Wind: Off.
- Compute Shaders: On.
- Texture Quality: High.
- Effects Quality: low.
- Shadow Quality: off for potato PC. Medium for everyone else
- Game Screen Render Quality: 100%.
- Maximum frames per second allowed: your monitor refresh rate or slightly higher
Dota 2 Recommended Esports Courses
MAX FPS Settings Guide: DOTA 2
Steam Launch Settings DOTA 2:
When it comes to steam launch settings of DOTA 2, the following are the best settings according to me:
To set the Steam Launch options:
- Open the Steam launcher
- Go on the Library tab
- Right-click on DOTA 2 as shown in the image below:

- Select Properties and go to the GENERAL tab
- Click “Set Launch Options”

-map dota -high

In-Game Settings For DOTA 2
Launch Dota 2 from Steam, click the Settings icon on the top left and go to the Video tab as shown below. I will show you how to set up each in-game setting for maximum performance and FPS boost.
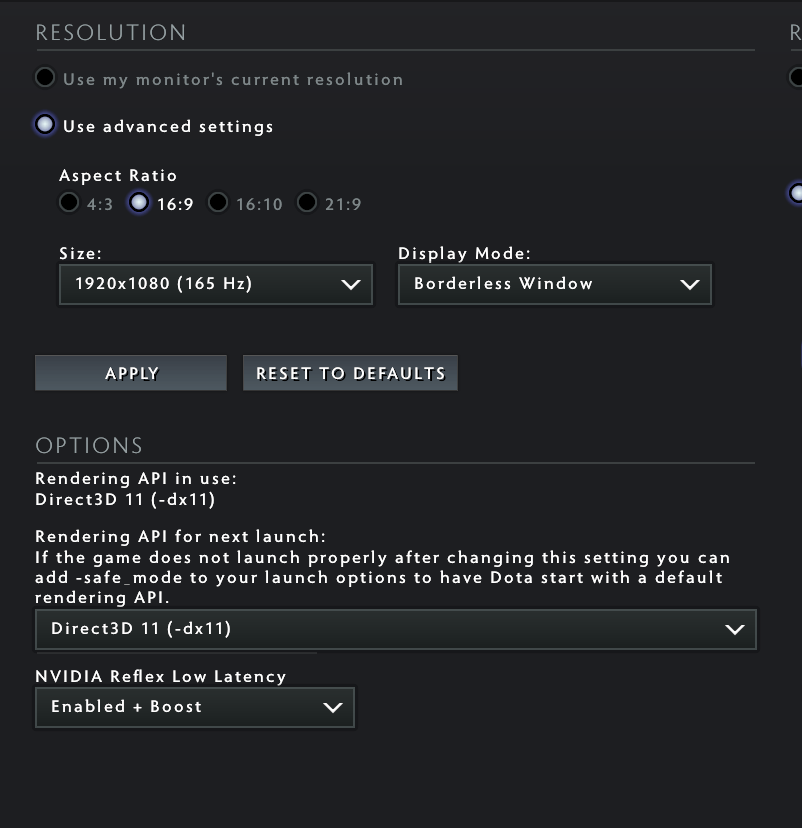
Resolution
Use my monitor’s current resolution: Off.
I recommend using the advanced settings as you get much finer control. However if you get any bugs or display issues then turn this on.
Aspect Ratio: Use your default one.
It depends on your monitor display, but most have a 16:9 Aspect Ratio.
Size: Use your MAX resolution.
Use your Max Resolution for the best gameplay and viewing experience. Lowering this causes a huge drop in quality so do it as a last resort.
Display Mode: Full Screen.
Full Screen is the best choice for performance and gameplay experience.
Options
Rendering API: DX11.
The options shown are DX11 and Vulkan
DX11 provides the best performance.
Note: Compute shaders option is enabled only when you have DX11.
Nvidia Reflex Low latency: On + Boost.
Test on your system how the latency feels with these settings. I personally felt the latency to be better with this set to on and boost. This is more system based so make sure to test it out.
Rendering
Use basic settings: Off.
This slider is a simple way to adjust graphics, but I don’t recommend using it as a solution. Selecting and adjusting each option manually gives the best performance and graphics balance suited to your preferences.
Use advanced settings: On.
Disable all the settings, as shown in the image below.
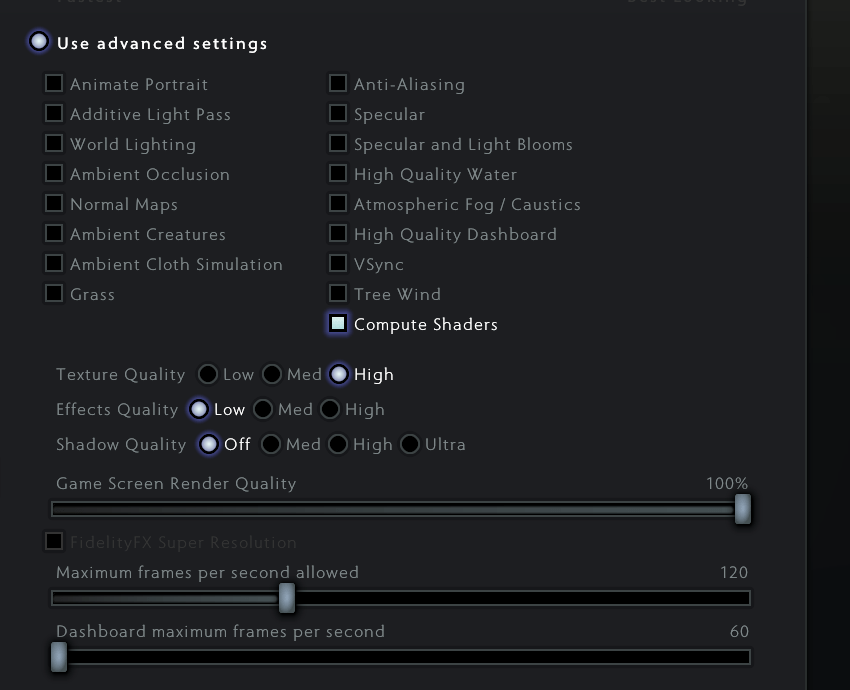
They don’t really give any competitive advantage in the game. They only add animation effects to the game. If you are playing for competitions or if you want the MAX FPS then disable everything except Compute shaders.
Animate Portrait: Off.
You can enable this if you want better-looking character portraits. I personally disable it for more fps. But if you want some better-looking gameplay then you can enable this. FPS impact is minor.
Addictive Light Pass: Off.
Gives a light pass effect. It makes the lightning and reflections look nicer. Suppose there are multiple sources of light illuminating the same object. It basically does an addictive pass of the light effect so it looks cleaner and better. Can help on darker screens but is not really needed for competitive gameplay.
World Lighting: Off.
Not much to explain since the name says it all. The game looks better with it so you can turn it on. You check the difference by turning it on and off and you will notice the difference in the lightning-source count. It does cause a fps drop.
Ambient Occulsion: Off.
Gives more depth to shadows of objects. It calculates the way the object will look after different light effect bounces. Best to turn it off for more fps in Dota 2 graphics settings
Normal Maps: Off.
Changes the way the map looks.
Ambient Creatures: Off.
As the name suggests disables ambient creatures.
Ambient Cloth simulation: Off.
Disables the cloth simulation for Immortal Gardens terrain that has cloth/flags at various points on the map, this option basically turns off the physics simulation for the cloth/flags. Turn this off for competitive and online gaming.
Grass: Off.
The name says it all. Disables grass in Dota 2 via the Dota 2 graphics settings
Anti-aliasing: Off.
Smooth jagged edges by using antialiasing in games. Now you get jagged edges when your monitor is too big compared to your screen resolution. This setting will make the edges look less jagged but will cost you a bit of a performance drop as a result. For best fps turn it off.
Specular: Off.
Specular allows light to pass through objects giving a bit of transparent effect. This setting applies to lightning and shadows. Not needed for most players. You can turn this off.
Specular and Light Shadows: Off.
This setting deals with the specular effects of shadows. You can disable it for more fps.
High-quality Water: Off.
As the name suggests increases the quality of water. You can disable it.
Atmospheric fog / Caustics: Off.
This setting deals with atmospheric fog and the way the fog of war looks like. I recommend you to disable it in Dota 2 graphics settings
High-quality Dashboard: Off.
Self explanatory. Gives you a high-quality dashboard.
VSync: Off.
This setting caps the buffered refresh rate to the refresh rate of your monitor. It is meant to prevent screen tearing but in most cases, you won’t notice it. The issue with Vysnc is that it adds input kag in most games. So it’s best to disable it.
Tree Wind: Off.
Affects the way trees behave. Can be turned off for more fps.
Compute Shaders: On.
This is a hidden option that will only appear once you select DX11 as the rendering API. Gives a performance boost for most systems. I recommend testing this for your particular system and configuration.
Texture Quality: High.
This should be HIGH since it dramatically affects the quality of your graphics. FPS is not affected too much. It uses graphics memory instead.
Set it to low only if you have a very old graphics card with less than 2GB of memory.
Effects Quality: low.
Adds special effects to spells and attacks. They are not really required for gaming professionally. It gives a good FPS boost by setting it to low in Dota 2 graphics settings
Shadow Quality: off for potato PC. Medium for everyone else
Turning this off gives an excellent performance and FPS boost to your game. But the game looks really bad. Dota 2 looks a lot better with shadows; however, they do not affect gameplay. If you want a better visual experience, you can set it to medium. For potato PC off is the best option.
Game Screen Render Quality: 100%.
Always use 100%. Lowering this gives a performance boost at the price of display quality. And that price is enormous. You will get blurry textures. Below 70% game becomes unplayable. So change this as a last resort in Dota 2 graphics settings.
Maximum frames per second allowed: your monitor refresh rate or slightly higher
This is the FPS cap of the game. Keep it the same as your refresh rate or slightly higher to get a competitive advantage in playing DOTA 2.
The maximum value via the in-game options is 240 FPS, but you can set a custom limit with the +fps_max # command as shown in the launch options above.
#= replace with a number
Note: Unlocking the frame rate will cause overheating problems for laptops. It will also create a battery drain issue. Only useful for Desktops.
- Click Apply to save the changes.
Viola! Now you can get the best FPS and gaming experience for DOTA 2 without having to buy a costly Gaming Rig. I hope you like the DOTA 2 FPS Guide and that you were able to get the performance and FPS boost you need.
Do share with your fellow DOTA 2 players.
DOTA 2 Recommended Esports Courses
Must read: How to increase your System performance for gaming

